Logo

Logo

Thursday, December 27, 2012

Dealing With Chicken Injuries


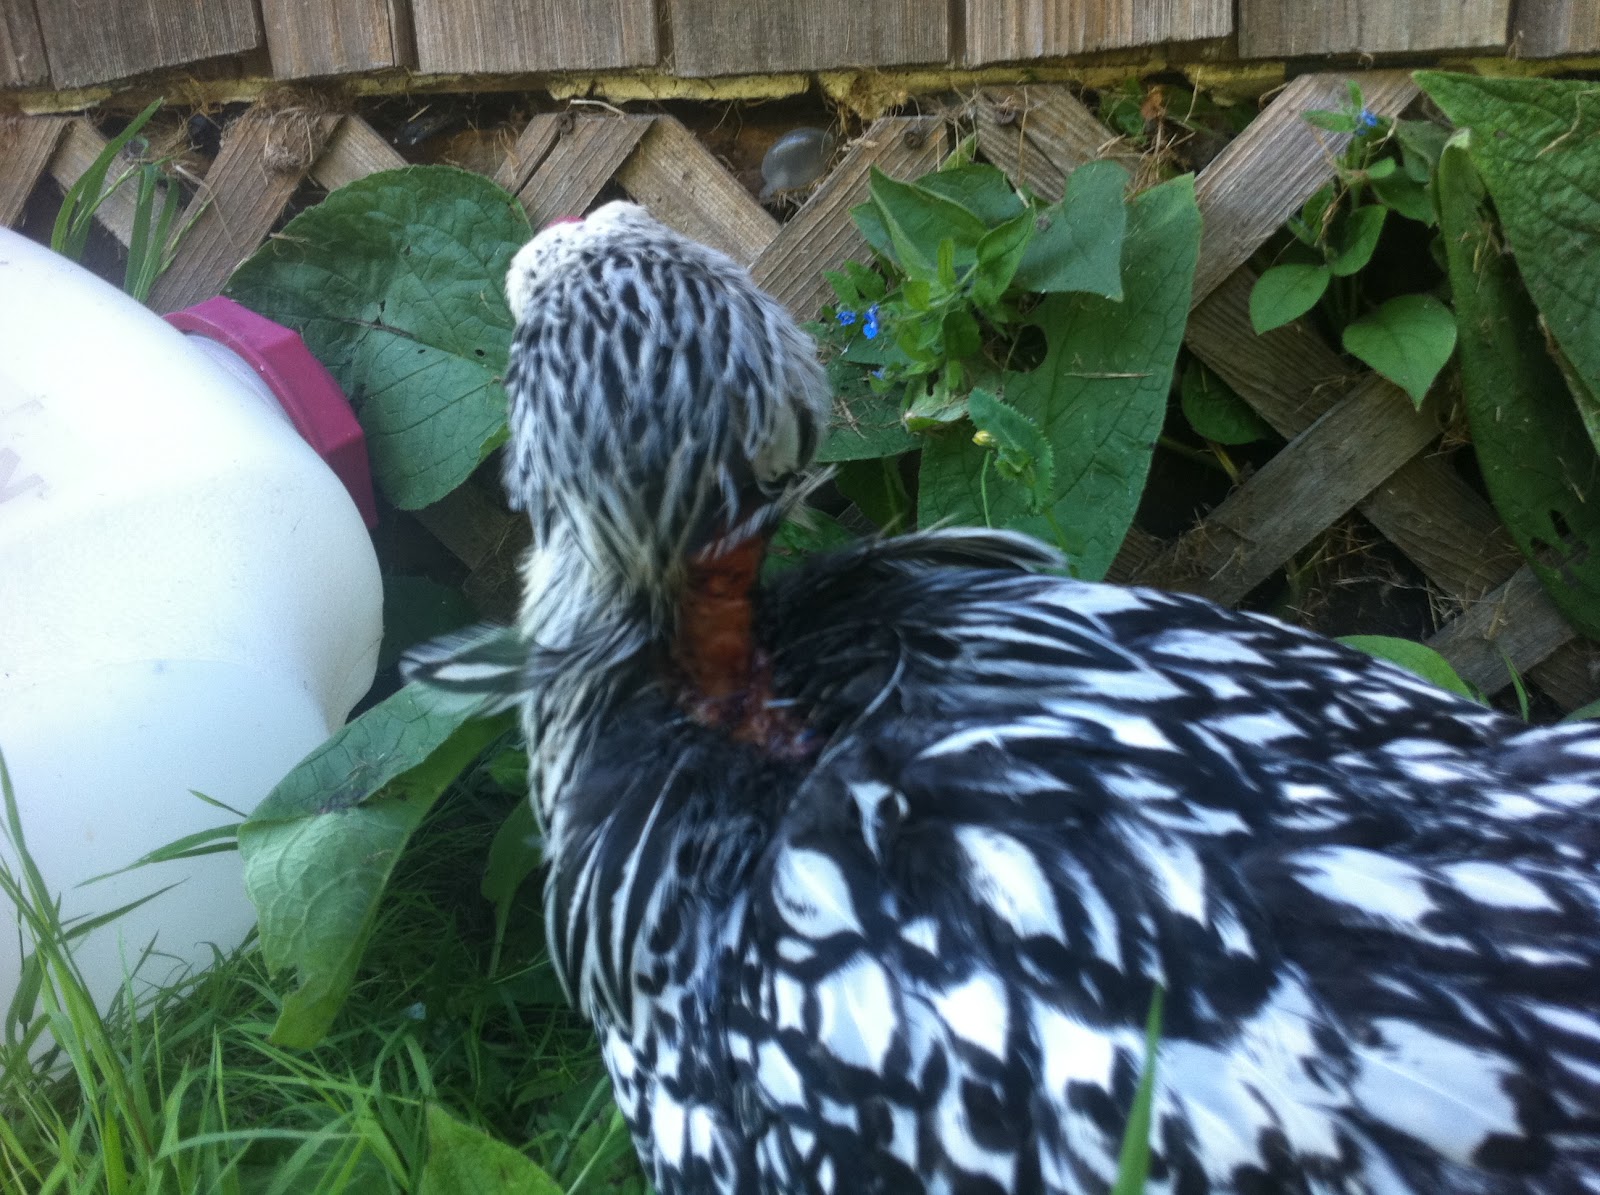
My poor Wyandotte was attacked by two little dogs.  They ripped out her tail feathers and as you can see her neck feathers.  It was really raw from them ripping them out in chunks.

To avoid terrible stress on my chicken I isolated her from the flock in a cat carrier.  I put her in a quiet, draft free place and left her there undisturbed with water, checking her twice daily to be sure she was drinking and her wound was clean.

I took her from the flock because frequently the other chickens will pick on an injured chicken.

She seemed OK, but did not eat during the  two days of isolation.  YOu may need to keep your hen apart for longer, but I felt she actually wanted the comfort and familiarity of her pen.  Before returning her I cleaned the wounds with water and a clean towel.

I purchased a can of spray wound disinfectant with aloe.  The stream on it was powerful enough to shoot 12+".  This was really handy in the pen in the days that followed as she really didn't want anyone near her.  I could spray the would without having to restrain her very much.  I did watch her to make sure she was eating and not being picked on.  I sprayed the wound twice daily with the disinfectant.

Over the next few weeks she healed and began getting around as usual.  I am sad to say that not many of the feathers have grown back.  This is particularly disappointing as she was my prettiest hen.  As a matter of fact, I used to pick her up and tell her how I loved her neck feathers!

Tips for hurt hens:

  • Clean wound carefully
  • Add disinfectant spray or polysporin/bag balm
  • Isolate from hens until she is strong enough to rejoin hens
  • Keep her in clean environment
  • Leave her alone! (she really is stressed by you touching her)
  • Make sure she has access to water and food
  • Once back with her pen mates, make sure they don't pick on her
  • Retreat open wounds daily
  • Let nature heal her

Friday, December 7, 2012

Baked Delicata

Delicata is a wonderful squash that not many folks are familiar with. It is truly superb in that it is lightly sweet, unlike butternut.  Because of this you can make it savory or sweet.

To bake delicate simply split in half and seed, just like you see at the left.  Rub the flesh of the squash with olive or coconut oil.  Add desired spices, place flesh side down in baking dish, and bake at 375 until fork tender (about 45 minutes).

Possible spice rubs:

1 ts curry, 1/2 ts salt, 1/8 ts cayenne

sprinkle with salt and pepper

salt and cumin are one of my favorite

1/2 ts salt, 1/8 ts cayenne, 1 tbs brown sugar

1/2 ts garlic powder. 1/2 ts onion powder, salt and pepper

sprinkle with salt and brown sugar

1/2 ts ground mustard, 1/4 tsp onion powder, 1/8 ts garlic powder, 1/8 pepper, sprinkle with salt

Get creative.  Delicata will lend itself to whatever you spice it with.  Remove it from the oven, cut into 3 pieces and serve with skin.  The flesh should come out easily with a fork so nothing special is needed.  What a wonderful alternative to potatoes!

Friday, November 30, 2012

Delicata Squash Soup

This is a nutty, sweet soup with a little kick perfect for cold winter nights.  This is quick and easy. Double teh recipe if you want more for later.  The amount of squash in this makes it hardy.

Ingredients

4 tbl olive oil or butter
pinch of chili flakes
1 clove garlic minced
1 large onion chopped
32 oz chicken or vegetable stock
1/4 teaspoon cumin
3 delicata squashes peeled, seeded, cubed 

Cooking
1. Heat oil/butter in stock pot, add chili flakes and garlic.  Cook in oil for 1 minute.  Do not brown garlic.
2.  Add onion.  Keep on medium heat.  Cover and cook for 10 minutes, stirring a few times.
3.  Add broth and cumin.  simmer covered for 15 minutes.  
4.  Add salt if you need a little.
5. Add cubed squash and simmer covered until squash is fork tender (about 10 minutes).
6. Serve!  You can add a dollop of Greek yogurt or sour cream to make it creamy. 


Monday, November 19, 2012

Believe in Yourself


            Mom has been diagnosed with cancer.  This has really put a lot in perspective.  The day before we found out, my husband and I had our worst fight ever, the next day was the diagnosis and the following day I was present at my neighbors birthing.  It really drove home how life is happening on so many levels. 


            Really though, what I see is that God’s glory is a mystery.  It continues to unfold in ways that are often foreign to us.  Things that we want to say are bad are the tools that give the Holy Spirit access into our hearts and minds.  Our lives are transformed if we have eyes to see and ears to hear.  People are fighting, being born and dying. and all of it is His great plan.


 We are people sitting on the threshold of a new season in life.  We have been positioned by God to do something genuine. Every day affords us an opportunity to live in our divine self.  We have been prepared to manifest God’s glory by the thimble of sanctification He has achieved in us.  

But more specifically, this is YOUR moment to be in the great I Am.  Don’t waste it on wrestling with doubt and fear.  Go forward and be what you have been created to be.  It’s easier than you think if you let God rise up and the cares of this world slip away.
         
   You can’t go wrong.  You are simply wonderful you.  You are ready to love life and the people around you.  I hope today you will relax into God’s grace and trust that you know what you need to.

Wednesday, September 19, 2012

Farming 2012


This year's farming was miserable!  We lost a ridiculous amount of money.  We put in an acre and a half of onions.  Have you ever planted that many onions?  We had to pay workers, it was difficult of to find workers worth a d$#%, and they really did a crap job in places.  OK we made it past that.  The climate was awful and was perfect for weeds, but not so great for crops.  All the farms around us (and we are all organic) had the battle of our lives with amaranth.  Onions don't like competition.

The quality of our fertilizer was terrible.  We didn't discover this until 1/2 way through the season when our growth just wasn't adding up.  Chicken poop is now $100 a ton delivered from far away at a $250 freight charge!!!!!!!!  The onions were small when we discovered our neighbors got a virus on theirs.  Their field was just accross the street.  We prayed and fed our onions hoping for the best to no avail.  The virus jumped the road and arrested the growth.


By this time we were $$$$ into labor and fertilizer.  Maybe 1/30 of the onions were salable!  OUCH!!!!!!!!!  We tried harvesting them, gave up because it just wasn't cost effective and tilled them in.

We had HORRIBLE germination on the Delicata.  We stuck it out in the side field with them reseeding in blank spots.  They got fed and we managed to keep the weeds down with timely tractor cultivation.  Looking at the fruits out there we find that the genetics of the Delicata have been corrupted.  Fruits have the right coloring but 1/3 of them are incorrectly shaped, some of them around a foot long (?!). What's up seed breeders?!

Our white beets were a wonderful growing success.  Unfortunately the public just isn't familiar enough with them!  We can't seem to sell them to save our lives.  I am deeply saddened and discouraged by this.

My home garden has been a success EXCEPT for the deer.  They took a bite out of every melon, ate my beans, I never got a strawberry, and they trampled my cucs!

I had an excellent year on Romas with no blossom end rot.  Too bad I grew them so close to other tomatoes or I would save the seed.  My Brandywines all have something that causes a rotten spot on all of them ruining half the fruit??????? but I am using them for canning anyway removing the bad halves.

Apple harvests were great and I have put up quarts of pie filling and apple sauce for the year.  The Pear tree I discovered in the yard is INCREDIBLE.  I am drying them and making pear sauce galore.

I lost about 1/10 of my new orchard because of deer, but the rest seem to have made it, many flourishing.  I consider this our true success. We are looking at a farm plan that moves towards perennials since we work outside the farm and need a different type of crop and isn't fruit always salable?

JJ continues in his breeding projects and we are pleased with his progress.

Whew! It's almost over and we are looking forward to cover cropping.  I have learned a lot his year--mainly that I know VERY little about farming, but I am grateful for the lessons I was given.

Saturday, June 30, 2012

Chilled Avocado Soup

As we head into summer and can find avocados at the store right now, I thought I would post this easy soup.  It's really great in your VitaMix blender.  We love ours!

Serves 4

2 avocados, peeled and seeded
1 cup broth
2 Tbs lime juice
6 Tbs sour cream
6 Tbs heavy cream
1/2 tsp salt
Chopped shallots

Put all the ingredients in the blender and blend until desired smoothness.

Chill for several hours and serve.

Variations:
* Add a  little jalapeno to the mix.
* Top with salsa.
* Top with crumbled Queso Fresca.

Tuesday, June 5, 2012


Shall I compare thee to a summer's day?
Thou art more lovely and more temperate:
Rough winds do shake the darling buds of May,
And summer's lease hath all too short a date . . . .
                                                                  Shakepeare - "Sonnet 18

Wednesday, May 9, 2012

How to Plant Potatoes


Buying Seed Potatoes
Buying good seed potatoes is really easy.  You can simply buy them at the market if you like, choosing your favorite varieties.  If you like more exotic potatoes, you may need to buy them online.

Planting Potatoes/Soil Prep
In order to plant our seed potatoes from last year we had to wait for it to get warm enough.  We tilled the ground up and fertilized with manure and lime (to help with the Ph of the soil). J sat and cut the potatoes into pieces making sure to leave at least 3 eyes.  Leaving more eyes is a good idea in my opinion because it ensures sprouting. For small fingerling potatoes I sometimes just throw them in whole.
Our beds are 5' from center of tractor tire to tire.  We made two furrows in the bed at 14" and 28".  I like my rows 28" apart because I find the extra space inward keeps the tractor off of them. After laying them out about 10"  apart in the furrows we came through with a cultivator and hilled them up.

Potatoes are one of those crops that needs to be hilled a few times in the season.  As time moves on we will side dress the plants with compost for continued feeding.  I like to side dress and then hill with the cultivator.  That way the compost gets layered in.

Once covered it takes up to 2 weeks till we see sprouts with leaves.Some folks like to cover their beds with straw, but this can carry weed seed. I find that the hilling takes care of weeds.  The potatoes get big and smother any other weeds out, making it only necessary to spot weed.

Pests and Problems
 Potatoes can get flea beetles on them. Flea beatles look like little "squareish" shaped fleas.  They jump when you touch the leaves.  They can suck a plant dry and kill it if not treated! You can cover with floating row cover to keep them off, but once you have an infestation you should spray with  spray with safer soap during the late morning when they are out and then with Neem oil later, which they HATE.  There are plenty of ready made organic sprays that do the job without lacing your plants with poison. We usually spray (using backpack sprayer) a few times, over a few days until we stop the little beasties.
Sprouted Potato Plants  
Remember! Potatoes are a root crop.   Non-organic pesticide is stored in the roots of the plants heavily!   


Tuesday, May 8, 2012


But soft, what light through yonder window breaks?
It is the east, and Juliet is the sun.
Arise, fair sun, and kill the envious moon,
Who is already sick and pale with grief
That thou, her maid, art far more fair than she.
                                             Shakepeare - Romeo And Juliet 

Tuesday, May 1, 2012

Railroad French Toast

This is from Dee Dee McCuskey's, Ketchum Cooks cook book.  Its ranch chow and very fun.  Just simple twists really on simple ingredients.

Serves 6

6 eggs, Beaten
1/2 cup milk
1 Tbs cinnamon
1 tsp vanilla
Dash of Nutmeg
1 loaf stale French bread

MIx the ingredients in a bowl. Slice and soak stale bread in the mixture and then:


*heat a pan with 1/4 cup corn oil and 1 Tbs butter and fry until golden and crispy
OR
*Get this, they say to deep fry it!  I haven't done it.  I'm sure it's decadent! 

Thursday, April 26, 2012

Get rid of fears...


Sometimes fear dictates our lives in subtle ways.  It can be difficult to identify, but if you are not getting the results you want in a given situation (especially if it's repeated), try to get to your fear.  Once there, ask yourself, "If my fear comes to pass, then what?"  Don't stop there.  Keep asking the same question until your fear becomes silly.  If that happens then... And if that happens then....

Some fears are good ones, like fear of harming others, going to jail, etc.  But living life from a constant fear  of loss is looking at the world through the eyes of lack.  Focus on abundance and fear dissipates.  Try it out for a solid day and then a solid week.  You will be happier, create less lines on your face, and others will love being around you.  Trust is so much better than fear!

Tuesday, April 17, 2012

I believe that there is a subtle magnetism in Nature, which, if we unconsciously yield to it, will direct us aright.  
                                               ~Henry David Thoreau

Tuesday, April 10, 2012


"Be not afraid of greatness: some are born great, some achieve greatness, and
some have greatness thrust upon 'em."
                                                         Shakespeare - Twelfth Night 

Tuesday, March 20, 2012

I love to think of nature as an unlimited broadcasting station, through which God speaks to us every hour, if we will only tune in. 
                                          ~George Washington Carver

Tuesday, March 13, 2012

All the world's a stage,
And all the men and women merely players:
They have their exits and their entrances;
And one man in his time plays many parts.
                                          Shakespeare - As You Like It

Monday, March 5, 2012

I was watching a reality show about drug addicts.  One of the women on the show was crying about her daughter, desperate to see her quit and she sobbed, "I'm afraid if she doesn't do it she never will."

Well, duh, I thought and I laughed out loud.  What she meant to say was, "If she doesn't do it now, she never will."

As I pondered the idea of doing things now I was struck with the simplicity and almost terrifying knowledge that NOW is all we ever have.

Too often I am stuck in my head with lists of things to do, what someone said, and what tomorrow brings that my now slips away into yesterday. Sometimes my now is painful and I would rather not be there. Sometimes my now is wonderful and I never want it to be anything else.

I think being present is a struggle for most of us--adults.  Jesus said, "Truly I tell you, unless you become like a little child, you will not enter the Kingdom of Heaven." He was talking about being present tense I think. Children have this incredible ability to tune out everything, suspending judgement, and be totally present.  As a matter of fact, we parents spend our lives trying to teach them to think ahead and be cognisant of the ramifications of there actions.  After all, running with a pencil in your hand could lead to permanent disability.  I don't think Jesus was asking us to live carelessly, but carefreely.


Bear with me here folks. I would like to ask everyone to try to do something carefree today.  To interject "carefreeness" somehow into your day. Maybe it's time to roll down a grassy hillside.  Get creative.  Maybe this means supending doubt about someone.  Maybe you can let them be someone totally fresh?  This is a really great exercise with people that drive you nuts. How about crying, even though it's inconvient.  If you are sad, maybe you need to be for just a moment.

I believe that this little exercise will yield some interesting revelations.  So try it and share your experience!

Wednesday, February 22, 2012

O wonder!
How many goodly creatures are there here!
How beauteous mankind is! O brave new world
That has such people in't

                                             Shakespeare - The Tempest 

Tuesday, February 21, 2012

Adopt the pace of nature:  her secret is patience.  
                      ~Ralph Waldo Emerson

Saturday, February 18, 2012

Cauliflower and Pumpkin Caserole

This was a recipe I discovered a few years ago and really liked.  Now that we are in winter, most of us are looking for something new to do with our veggies.  You will find this quite simple and a nice break from your regular flavor profile. This is unique comfort food.


  • 1 c bread crumbs
  • 1/2 hulled toasted pumpkin seeds
  • 1 tbs butter
  • 3/4 c crumbled goat cheese
  • 2-3 lb pumpkin peeled, seeded and quartered
  • 1 head cauliflower
  • t tbs flour
  • 2 cloves garlic minced
  • 2 tsp mustard seeds
  • 1 1/2 tsp salt
  • 3/4 tsp cumin powder
  • 1/2 tsp pepper
  • 1 1/2 c half and half
Preheat oven to 400 degrees.

Combine pumpkin seeds, bread crumbs, butter, and half of the thyme in a bowl.  Stir the goat cheese making sure not to over blend, leaving the goat cheese chunky. In a separate bowl combine the flour and the spices.  Cut the pumpkin into 1/4 inch strips and the cauliflower as well.  Place one third of the pumpkin in a buttered 1 1/2 quart casserole dish and sprinkle with 2 tsp of flour mixture. Continue by layering a third of the cauliflower and 3 tsp of flour mixture, third of the pumpkin, etc. Pour the cream over the entire casserole.  Bake in the oven on a cookie sheet for 35 minutes.

Cooks Note
  • use those left over bread ends going bad for your bread crumbs.  Just crumble by hand.

Monday, February 13, 2012

Tips for building a chicken coop...


It is the time of year for building your chicken run in anticipation of spring chicks.  Here are some tips I gathered from my friends at TEG!
  • super nifty idea- Build a brooder/nest so you can lock a hen in there if you want to.  It can come in handy  for different reasons.  It just adds flexibility to your ability to manage your hens.  You can build with a space between where you can lock a hen in the nest and give her food, 
  • water, and some room to go poop.    This has also can come in handy for a few things, a broody while hatching, a place to isolate an injured chicken, a broody buster, many different uses. The builder of this brooder said they would build it bigger if they were to do it again.
  • If you elevate something, elevate it enough for the chickens to get under it.  This applies to an elevated coop or things inside the coop like nest boxes or maybe waterers and feeders.  And in the coop, consider the height of the bedding if you use any.  If chickens cannot get under anything, it becomes a great place for Mommy Mouse to raise a family, or possibly rats, snakes, or other things you don't want around can hide under there.  Also consider that you might need to get an injured or sick chicken that does not want to be caught from under a coop or somewhere inside your coop.  Also, they can lay eggs anywhere.  You need access and chickens need access.
  • Size of the coop and run matters.  There is no one answer for everyone on how big the coop and run need to be because we all have different climates and different management techniques, but build it bigger than you think you need to.  It gives you more flexibility in how you manage your chickens, it allows you to possibly expand the number of chickens, it helps reduce the chances of social problems from overcrowding like featherpicking and cannibalism, and the bigger it is the less work I have to do.  If you squeeze them in a small space, you probably have to do a lot more poop management, for example.  
  • Most building material comes in 4' and 8' dimensions.  If you size your coop in increments of 4' and 8', you can use the material more efficiently.  For example, you can probably build an 8' x 12' for about the same price as a 7' x 11' and have less waste and cutting.  


  • Chickens prefer low nesting boxes.  My hens all used the same box on the ground. On the left they have created several nesting boxes for a larger pen.
  • If you have the slope of the roof on the north and south then you can have a steep pitch on the south facing roof and cover the roof with *corrugated pvc then have as many windows as possible on the south wall you really only need lights for for when you go in at night.
  • Slope any roof, whether in the coop or the run, so the water flows away from the run, not into the run.  Sounds obvious, but you'd be surprised how many people don't do this.  Also when positioning your coop and run, locate them where water does not run into them.  Build them on slight rises or divert rainwater run-off with a ditch or, my preference, a berm.  And try to position you run where any water that does get in drains.   This is super important here in the NW!
  • Keep any width that you're going to cover, coop or run, to 8' maximum.  The wider you make it, the stronger and more expensive the material to support snow, ice or wind load will be.  8' is plenty wide enough for you to be able to work inside if you have a walk-in coop and does not really waste space.  You can span that width reasonably.
  • Ventilation is extremely important in the coop, but you don't want drafts directly on the chickens if you have cold winters.  Wind chill can be an issue, but your big risk in cold weather is moisture build-up in the coop.  That can cause frostbite.  Chickens handle cold much better than heat, so you really need a lot of ventilation in the summer if you are in a hot climate, but they need ventilation in the winter too.  The way I recommend getting around the draft versus ventilation issue is to have overhangs on your roof and leave pretty large openings up there.  As long as the openings are over their heads when they are roosting, they are out of drafts.  A cross breeze over their heads won't hurt them.  The overhangs will help keep rain out.  In the summer, openings low to let in more ventilation is great, but you need to be able to block off any low ventilation openings in cold winter weather to avoid drafts directly in them.  Cover any opening with hardware cloth or chicken wire so predators cannot climb in.  
  • You can put in doors so you can collect the eggs without going in the coop.  They can be drafty, may let in rainwater, and may be weak spots that can allow predators access, depending on how you build them.  It is important to look in the coop when you collect eggs. Folks have  found  possums, snakes, and dead or injured chickens in the coop when they looked inside.  You can see the back side nest opening to the left


  • You can make roosting perches removable by drilling a hole slightly larger than the large nail you drive through your roosting perch.  You can remove perches for cleaning and greater mobility in the coup.

Friday, February 10, 2012

Italian Sausage Shepherd's Pie

This is a wonderful meal that is really quite easy to prepare.  Everyone will be impressed by the twist on this old classic.
  • 4 carrots chopped bite sized
  • 2 parsnips chopped bite sized
  • 1 medium onion chopped
  • 3 cloves garlic chopped
  • 6 Italian Sausages Sliced into 1 inch Pieces
  • 1/2 cup flour
  • 3 cups water
  • 1/4 cup Worcestershire Sauce
  • 4 tbs soy sauce
  • salt and pepper to taste
  • leftover mashed potatoes
Preheat oven to 400 degrees.  In a bowl toss parsnips and carrots with 2 Tbs olive oil.  Sprinkle vegetables with salt and bake on a cookie sheet until fork-tender; about 25 minutes. 

Meanwhile, heat 2 tbs olive oil in large skillet. Add onion and garlic and saute until just tender and then add sausage. Cook sausage until browned and onions are caramelized.  Add flour and stir for 1 minute on medium heat. Add wet ingredients and stir until bubbling. Add roasted veggies and stir.

Pour into baking dish and cover with mashed potatoes. Reduce heat to 375 and bake for 30 minutes or until potatoes begin to brown..

Cooking definitions:
saute- To cook food quickly, using a small amount of fat/oil  without browning.  It helps cook flavors together. It is important not to over crowd ingredients when sauteing. 
fork-tender- When something is cooked to the point that a fork easily penetrates it all the way through.

Monday, February 6, 2012

Our Fruit is for Others

We all know that when you plant an apple seed you do not get carrots. What you sew is what you reap and metaphorically each of us is like an garden.

Each piece of us is like a tree or plant producing fruit.  Here I am with all my aspects and these aspects are producing fruit in my life.  The thing is, our fruit is not for us!  Our fruit is for others.

What are you producing?  Is there unforgiveness in your life?  Did you plant it and a bitter tree has sprung up?  Bitter fruit is not what we want to pass out to friends and family--let alone be known for.

Are you sewing seeds of anger in yourself and others?  Those are fruits no one wants to eat.

Maybe you have been raised on a diet of yucky fruits, and you don't even know what sweet luscious fruit there is to be partaking of.

Well, you don't have to worry.  If you need some good seed, just ask.  Go to the source.  Love is right where you are right now waiting to show up in technicolor.  No longer do you need to live in the black and white and gray of Kansas, but rather OZ is ready and waiting.  The Kingdom of Heaven is here!

Maybe you feel as far from Heaven as you can get.  No matter, ask.  Ask with an open heart that the One who gives all good and perfect gifts would give you fresh ??? (help, direction, purpose, healing, etc.)

After you ask listen for love.  Maybe it is a feeling that overcomes you.  Maybe it will show up as a picture in your head.  Maybe it will show up as one word you hear in your head or even audibly.  Maybe a letter, phone call, or? Wait for it.  Expect it.  Believe in it. Let it be beyond your ability to ask imagine or dream.  Don't box love up and tell the Divine how it's going to be.

Relax knowing that Love has your best interest at heart.  Love sees all and knows all.  Let love serve you in ways you don't dictate.  Get excited to see it show up.  Remove all your ideas of it and let the Divine be fresh and wonderful.

Letting go is so refreshing.  Trust is so much better than struggling against reality.  Trust Love.  Make it your purpose every day, every minute.  Soon you will have a bumper crop and folks will be flocking for another taste of the goodness you produce!


Saturday, January 28, 2012

Heavenly Tomato Soup

This is a family favorite.  It is so easy and quick.  Unlike a lot of soups who take hours for flavors to develop, this is a quick jaunt from pot to bowl. You can top it with chicken, tofu, or shredded beef.


  • 2 tbs olive oil
  • 1 carrot chopped
  • 1 med onion chopped
  • 2 cloves garlic minced
  • 1/4 c flour
  • 28 oz can of whole tomatoes or 3 pints of your canned tomatoes or 4 1/2 cups peeled cored chopped fresh tomatoes
  • 16 oz vegetable/chicken broth
  • 1 tbs Italian herbs or 6 leaves fresh chopped basil
  • 1/4 cup heavy cream
  • salt and pepper to taste
Heat olive oil in pan and add carrot, onion and garlic.Saute until onion is tender. Add flour and stir till veggies are coated.  The little bit of flour helps to cut the acidity a bit and make the soup thicker.

Add tomatoes, stir and heat through.  Add broth and spices. break up tomatoes and simmer covered, stirring occasionally, for 20 minutes.  

Puree soup in small batches in blender or with immersion blender in the pan.  Add cream, heat through and serve.

Cook's Notes
  • If it is still too tart I add 1 tsp brown sugar/honey/agave nectar.
  • Add 1/4 c Parmesan with cream for a spin.
  • add minced sun dried tomatoes with herbs for a little kick.
  • 1/4 tsp chili flakes really makes it zippy.

Thursday, January 26, 2012

Get Your Greenhouse Ready!

I'm itching to get in the dirt!  Good news we have a greenhouse.  Bad news is, it needs to be cleaned.

Unfortunately our greenhouse has a tendency to build up stuff over the summer.  We "stick" stuff in there promising to get it "later".  Later has come and I need to get the tarps and pots out and get ready!

Getting ready for greenhouse use:
  1. Remove everything possible.  By getting everything out of there I can see what need to be done and have room to do it!
  2. Weed the floor. If you have nothing but dirt, consider weeding it and putting down GOOD weed block. You can cover it with gravel.  I like the medium round rock as it is easy to weed and never compacts making weed removal easy. It's also barefoot friendly.  I like to be barefoot as much as possible.
  3. Take old soil from seed bench.  Removing old soil gets rid of any pathogens.  Ours is plastic lined and I will be washing with bleach water to sterilize the tray. See how to build a heated seed box.
  4. Begin sifting soil.  We built a really nice soil box last year for screening our soil and making our own blend of potting mix.  I highly recommend screening soil.  Getting the box filled with screened soil mix makes it easy to fill trays quickly.
  5. Create transplant area. Last year we had a little table with two chairs just across from the heated seed box where we start a lot of our seeds.  I noticed that a lot of soil fell to the floor.  I want to put down a tarp this year under the table.  The more soil that fall down into the gravel the more places for weeds to live.  I want to keep the floor free of dirt as much as possible for the longevity of the greenhouse.
  6. Sterilize seed trays. Dip all your tray packs and pots in a water bleach solution to kill pathogens and fungus.  You want to start as clean as possible in the greenhouse.  Fungus is your enemy in this prime environment!
  7. Fill sterilized trays with soil for direct seedings.  As soon as the temp permits we will begin sowing some seeds directly, like squashes, into tray packs.  Having the soil in the trays beforehand--but not too early (leaving soil in trays too long could allow fungus spores to land!)--makes me ready to just come in and plant.
  8. Create a schedule for planting. Having a schedule for starts in relationship to their days to maturity, greenhouse time and when they can go out is imperative.  When you have 30 things headed out at different times with different germination rates and days to maturity, you need to be able to look at a schedule and get it out of your head.  Very few of us can pull off something like multiple plantings and their needs without something to reference.
  9. Get a journal in place with pen attached. Keeping notes is a must.  Make notes about where you got your seed (you can even just glue seed packet on the page), it's germination rate, and any notes about stresses you potentially create to determine the viability of the seeds.  Maybe they all sprouted and then you stressed the heck out of them so yields were down.  Trust me, you won't remember the whys next year!
  10. Get any needed materials. Buy your seeds.  Get new containers if needed.  Pick up soils. You can now order our seeds.
  11. Reorganize and refine storage.  Think about flow and what worked the year before.  Get your supplies organized so that life in the greenhouse is a joy. Disorganization is a bummer.
Taking these steps will help you to enjoy your time in the greenhouse and get a lot done!


Tuesday, January 24, 2012

I only went out for a walk and finally concluded to stay out till sundown, for going out, I found, was really going in.
                                                      ~John Muir

Friday, January 20, 2012

Flooding on the farm


So we watched the last few days as our neighbors field filled with water.  This is what we do here when it warms and rains increase.  It creeps steadily toward the road and eventually crosses, sending the river into our neighbors farm.

When it hits this high it actually fills our front field and takes water, debris and top soil over to our other neighbors farm, Sweet Leaf.  Our garlic crop is under water right now.  :-(

Hoping there will be no damage, but I can't help but think that this is not the first flood of the year.  It is thrilling being out here on the farm watching the water rise and wondering how high it will get!

Thinking that next year we will not plant this field until the spring and rather stick to the side field and mid field.  However, I believe our crop will be fine if the water recedes in the next 48 hours.

Monday, January 16, 2012

Growing Squash Two Ways

I have really enjoyed growing and selling squash. For me it has been a great crop to learn a bit about the farming process from soil prep to planting to harvesting and market.

We grew squash 2 years in a row.


Year one:  The first year we decided to do squashes simply because JJ said they would be fun for me and an easier crop to start with.  When we delivered 10 cases and had them returned because they all suddenly turned, we knew we had failed.

 What not to do:

  1. They went in the ground late.
  2. The season was so short they were immature.
  3. While being harvested they were bruised and nicked.
  4. They were rinsed before storing.
  5. They were stacked too high.  
  6. They underwent way too many transfers compromising them further.
In addition we did not have adequate boxes to work with for packaging when ready and we had very little forethought as to what we would to with 2000 lbs of squash.  We tried to do farmers market too late to push the paper work through!  What a learning experience.

Year two: We planted the squash at the perfect time.  We literally had to weed twice because of the timing between tilling was so right on.  That is a something to look for.

What we did right:
  1. Worked the ground and fertilized well before planting.
  2. Allowed plants time to mature.
  3. Waited till the last possible minute to harvest them.
  4. Hired very careful help who harvested kindly.
  5. Purchased boxes from local company.
  6. Did NOT rinse them, but wiped in field at harvest with dry towel.
  7. Put in the cooler immediately no higher than 3 boxes high.
  8. Tried to maintain temp in cooler with heater on cold days.
  9. Made a market schedule for calls and delivery and followed it.
  10. Checked periodically for rot.
  11. Checked all boxes before leaving for markets.
 Things to do next year:
  1. Remind markets of who we are well before season begins.
  2. Gently turn and wipe off fruits while growing to avoid sitting spots.
  3. Side dress once early on.
  4. Have more than enough boxes to avoid multiple runs.
  5. Get shelving for cooler.
Why I like growing squash:
  1. It's easy care.
  2. Chokes the sun out to discourage weed growth.
  3. Deer don't eat it!
  4. Lower watering needs.
  5. You can sell blossoms too.
  6. It stores for 3-6 months 
  7. Common, everyone loves squash?!!
We didn't get rich, but we made money on this crop!  I can hit the market for 4 months and be done, so I can do other things.  It was very satisfying to grow indeed.

Wednesday, January 11, 2012


"Blow, blow, thou winter wind,
Thou art not so unkind
As man's ingratitude;"
                                                               Shakespeare -As You Like It