When planting an orchard there are a couple things that will help make your experience a success.
Find a nursery that has healthy plants. Ask around for recommendations.
It is best to buy your bare root trees and get them in BEFORE they bud out. As you can see we were late in doing this. The weather is forgiving and cool here and so we had success despite our late start.
Keep your roots moist while awaiting planting!
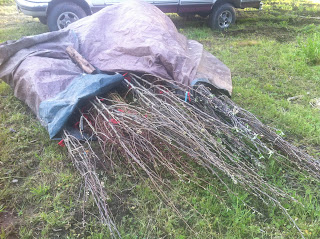
We wet out tree roots and wrapped them on a tarp to keep them moist. We also put them in a shady spot.
You can heal them in or if you have a tub large enough you can put the roots in water with some vitamin B and/or liquid seaweed. This will help with avoiding transplant shock.
DO NOT, however, leave the trees in water for days on end. You should try and get your trees in the same day or the next for best results.

Prepare your site
You want to till your ground, removing weeds. Adding lime if your climate requires it is a good idea. Getting the PH neutral is a great place to start.
Our ground was a little rocky, which is great for drainage. We needed to do something with this rocky river loam area and trees were a good solution.
Think about spacing
If you have a farm you may be thinking of the long and short of your orchard. Our trees were semi-dwarf. We chose a triangular, or staggered layout. The trees triangulated on 12' centers. (You can, however choose different layouts as described in articles online from your local extension service.) I achieved this by laying out a string line heading down the bed to square off of.
I then took three stakes, and tied them together with string 12' apart. They were tied so that I could simply move one end down, moving the triangle putting a flag where each hole went. This took 2 people. I tried it alone, but it was just impossible by myself.
Dig your holes
Once the flags are out marking where your holes should go, it's time to dig. I recommend digging the holes BEFORE you pick up your trees to avoid delay on getting them in. You will want to run a string line down the beds to get your trees centered for straight lines. Without the string your eye will fool you. This is something you don't move so getting it right is important. Remember you have to look at this for 40 years!
The holes should be as deep as your longest root, but you can trim side roots if you wish. I wouldn't trim them shorter the 14". All the existing root growth is available for better establishment of your trees.
This may sound silly, but make sure that you put the dirt you dig out from the hole directly next to your hole in a neat pile for refilling. You would be surprised how many folks can't dig a hole. They have just never done it. I have come back more than once to find that a worker has thrown the dirt far from the hole! If someone else is digging you may want to carefully outline the process to them.
 What to add to your trees holes
So what do I add to the holes for my new trees? There is a lot of debate about this. If your soil is dense or clay you want to make sure to add organic matter and sand for adequate drainage.
I added feather meal (for nitrogen) to the bottom of our holes for my trees to discover as they grew deeper roots.
Putting bare root trees in
Trim the ends of your tree to fit the hole. Make sure that downward roots are not wrapping around making a "J" root. You want those roots headed down and deep.
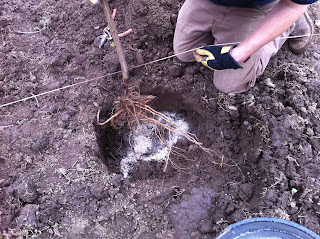
Make sure your trees are sitting up straight, that your graft point (you can see it to the right where the tree takes a jog) is going to be above the soil, and you are centered with your string line for straight rows you can enjoy looking at.
Carefully fill the hole pushing the soil in between the roots. Air pockets can leave room for standing water, or worse yet, critters.
About 2" from full I added about 1 cup oyster shell which will sit around those tiny little feeder roots you are probably seeing. Oyster shell neutralizes pH, adds trace minerals over a period of time as it breaks down, and helps with drainage. I cover my oyster shell and tamp the remaining soil.
I do not add compost to my holes because I want the tree to focus on root growth, not vegetative growth above. In following years I will add more nitrogen to focus on upward growth.
Water in your new orchard
It was sprinkling when we put out orchard in, but still I filled every hole with water to assure complete settling of soil and moistening of the roots. DO NOT tamp soil after watering. You do not want to compress air spaces at this point but rather allow natural settling of soil.
Watering a new orchard
Make sure your soil stays moist during those first few months. You don't want those roots drying out. Pay attention to the soil moistness and water as necessary in your area. You can also head out after that first day planting and straighten your trees if you find a few wonky ones out there.
Find a nursery that has healthy plants. Ask around for recommendations.
It is best to buy your bare root trees and get them in BEFORE they bud out. As you can see we were late in doing this. The weather is forgiving and cool here and so we had success despite our late start.
Keep your roots moist while awaiting planting!
We wet out tree roots and wrapped them on a tarp to keep them moist. We also put them in a shady spot.
You can heal them in or if you have a tub large enough you can put the roots in water with some vitamin B and/or liquid seaweed. This will help with avoiding transplant shock.
DO NOT, however, leave the trees in water for days on end. You should try and get your trees in the same day or the next for best results.

Prepare your site
You want to till your ground, removing weeds. Adding lime if your climate requires it is a good idea. Getting the PH neutral is a great place to start.
Our ground was a little rocky, which is great for drainage. We needed to do something with this rocky river loam area and trees were a good solution.
Think about spacing
If you have a farm you may be thinking of the long and short of your orchard. Our trees were semi-dwarf. We chose a triangular, or staggered layout. The trees triangulated on 12' centers. (You can, however choose different layouts as described in articles online from your local extension service.) I achieved this by laying out a string line heading down the bed to square off of.
I then took three stakes, and tied them together with string 12' apart. They were tied so that I could simply move one end down, moving the triangle putting a flag where each hole went. This took 2 people. I tried it alone, but it was just impossible by myself.
Dig your holes
Once the flags are out marking where your holes should go, it's time to dig. I recommend digging the holes BEFORE you pick up your trees to avoid delay on getting them in. You will want to run a string line down the beds to get your trees centered for straight lines. Without the string your eye will fool you. This is something you don't move so getting it right is important. Remember you have to look at this for 40 years!
The holes should be as deep as your longest root, but you can trim side roots if you wish. I wouldn't trim them shorter the 14". All the existing root growth is available for better establishment of your trees.
This may sound silly, but make sure that you put the dirt you dig out from the hole directly next to your hole in a neat pile for refilling. You would be surprised how many folks can't dig a hole. They have just never done it. I have come back more than once to find that a worker has thrown the dirt far from the hole! If someone else is digging you may want to carefully outline the process to them.
 What to add to your trees holes
So what do I add to the holes for my new trees? There is a lot of debate about this. If your soil is dense or clay you want to make sure to add organic matter and sand for adequate drainage.
I added feather meal (for nitrogen) to the bottom of our holes for my trees to discover as they grew deeper roots.
Putting bare root trees in
Trim the ends of your tree to fit the hole. Make sure that downward roots are not wrapping around making a "J" root. You want those roots headed down and deep.
Make sure your trees are sitting up straight, that your graft point (you can see it to the right where the tree takes a jog) is going to be above the soil, and you are centered with your string line for straight rows you can enjoy looking at.
Carefully fill the hole pushing the soil in between the roots. Air pockets can leave room for standing water, or worse yet, critters.
About 2" from full I added about 1 cup oyster shell which will sit around those tiny little feeder roots you are probably seeing. Oyster shell neutralizes pH, adds trace minerals over a period of time as it breaks down, and helps with drainage. I cover my oyster shell and tamp the remaining soil.
I do not add compost to my holes because I want the tree to focus on root growth, not vegetative growth above. In following years I will add more nitrogen to focus on upward growth.
Water in your new orchard
It was sprinkling when we put out orchard in, but still I filled every hole with water to assure complete settling of soil and moistening of the roots. DO NOT tamp soil after watering. You do not want to compress air spaces at this point but rather allow natural settling of soil.
Watering a new orchard
Make sure your soil stays moist during those first few months. You don't want those roots drying out. Pay attention to the soil moistness and water as necessary in your area. You can also head out after that first day planting and straighten your trees if you find a few wonky ones out there.


No comments:
Post a Comment