Logo

Logo

Thursday, February 28, 2013

Fermented Chicken Feed

I have been delighted to discover making fermented chicken food!  Since discovering this process I have reduced feed costs by 40% and productivity is up!  This method is simple and takes a low start-up investment. Special thanks to Marvelous Mud Washing Machine for turning me onto this money saving tip.  Check out her blog, it's worth it!

Materials List
  • 1   5 gallon bucket with lid
  • 1   2 gallon bucket (no lid required)
  • Drill
  • 1/4" drill bit
  • 1 bottle raw unpasteurized Apple Cider Vinegar
  • Chicken feed/grains
  • water


Step 1
Drill holes in the 2 gallon bucket along the bottom and up the sides for drainage.  As you can see by my pictures I have several.  This is so water can get into the grains and out.  Do not drill holes so big as your feed will come out.  You only need to go 1/2 way up the sides of the 2 gallon bucket.


Step 2
Place 2 gallon bucket inside 5 gallon bucket.
Fill 5 gallon bucket with water until it is 1/2 way up the  small bucket.
Add 1 cup Raw unfiltered ACV.


Step 3
Place chicken feed and desired grains in small bucket, filling only half full.
Put lid on 5 gallon bucket.
Leave for 3-5 days until bubbly.  This means the microbes are taking off.


Step 4
This is important!
Remove inside bucket, holding over large bucket.
Place two sticks across the top of the bucket for the little bucket to sit on and drain or it is messy.
I just sit it there and go collect eggs.  When I return it's ready.  Give chickens their fermented feed.

Now you have the microbial action going.  Just add more water, refill inside bucket, and return in ONE DAY! Pour more ACV in from time to time. It's that easy.


Note:  At first my chickens didn't like it.  But now they gobble it up!  The increased moisture fills the hens up quicker and avoids waste.  I am adding chopped garlic to help with parasite control.

Friday, February 22, 2013

Cranberry Orange Sweet Treats


This is a twist on my lemon dehydrator bars.  These are moist and dreamy. They have just a hint of cinnamon and are tangy with orange zest.  They best part about these is that they are pretty quick to make! Raw food does not have to be hard.


Ingredients
  • 2 orange juiced or 3/4 c
  • 1 orange zested
  • 1/2 cup honey
  • 1/4 tsp stevia
  • 1 dash cinnamon
  • 1/2 c dried cranberries minced finely
  • 1 c brazil nuts
  • 1 coconut
  • 1/2 c almonds
  • 3 tbs maca


Directions


  • Combine orange juice, honey, zest, stevia, and cinnamon. Wisk them together well.  
  • Add cranberries, cover and allow to sit for 1 hour.


  • In Vitamix grain mill or food processor grind nuts.
  • Add the Maca and mix/pulse.
  • Combine wet and dry ingredients.
  • Spread 1/2 inch thick on teflex sheets and score in desired shape..
  • Put in dehydrator at 110 for 4 hours.
  • Flip on mesh sheets.
  • Reduce heat to 105.
  • Dehydrate until chewy, about 8 hours.
  • Break apart and store in air tight jar/container.


Wednesday, February 20, 2013

Basil


Basil is really a treat in the garden.  Fresh basil throughout the summer months is a wonderful addition  to your eating experience.  It really is easy to love and easy to keep with just a few thoughts in mind:

Planting
  • Start basil indoors 4 weeks before last frost.
  • seeds need 70 degrees or higher to germinate.  Use under heat if possible.
  • Basil sprouts should get a soft pinch in their pots when there are 4 sets of leaves on the seedling.  A soft pinch would mean just removing the very top set of baby leaves with your finger nails. This will cause the growth back down into lower leaf bracts to send out new leaves, creating a bushy plant.
  • You may wish to do a soft pinch again after plant fills out.
  • Plant basil in Sunny location. At least 6 hours of direct sun.
  • Well drained, nitrogen rich soil is important.
  • Spacing-     12-14"
Care
  • Don't let Basil even look sad from lack of water.  Never let the soil dry out for an extended period of time. You don't want it to think it should flower.
  • If it begins to push flowers, cut them off the entire  plant.
  • You can throw a handful of manure at its base a few weeks after it gets established.  That is, when you notice the plant seems over its transplant "shock" and begins to put on new growth steadily.
Harvest and Uses
  • cut back a few of the top sets of leaves to use in fresh recipes.  Plant will then push new growth from pinch back well into the summer season and fall if not flowering.
  • Plant several and harvest whole plants to make pesto.
  • Dry with dehydrator on VERY LOW HEAT for several days until dry.  Don't let leaves touch while drying. Keep out of light.
  • Break up dry leaves with your hands. 
  • Store in air tight, dark jar.
  • Great on pasta and in sauces.
 

Zucchini Waffles

Thanks to Marshall for sharing this!

Zucchini Waffles
:  
:  
:  
6
Ingredients
  • 3 eggs
  • 1 large zucchini
  • 1 cup almond milk
  • 1⅓ cups water
  • ⅔ cup coconut oil
  • 2 and ¼ cups flour (I used spelt)
  • 2 T ground flax seeds
  • 1 T baking powder (aluminum-free)
  • ½ t salt
Instructions
  1. Puree zucchini with water. Transfer to large mixing bowl, and whisk in eggs and other liquids.
  2. Add dry ingredients and mix.
  3. Use a setting on the crispier side of your waffle maker’s settings.
  4. If you want to stuff the waffles with the kale salad, check out Spabettie’s recipe and instructions: http://spabettie.com/2012/09/03/tahini-kale-chiffonade-stuffed-waffles/
  5. Enjoy!

Wednesday, February 13, 2013

Banana Buckwheat Muffins

Buckwheat Muffins
If you haven't played with buckwheat yet, you should.  It really is tasty.  I have written an article on it's nutritional facts entitled Buckwheat sooo yummy! that you might want to check out if you are interested in this little seed and its benefits. I will say here that buckwheat is gluten free as it is not really wheat.  Anyway, these muffins are wonderful.  Make sure to store them in an air-tight vessel in your fridge as they can perish if left out for days.  This recipe makes six.  Perfect for breakfast!


Ingredients
Buckwheat Muffins in air-tight container
  • 2 very large eggs (or three medium)
  • 1/3 c honey
  • 1/2 a banana mashed
  • 1/4 tsp cinnamon
  • 1/4 tsp salt
  • 1 tsp baking soda
  • 1/2 c buckwheat
  • 1 medium apple diced "pea" sized
Directions
  1. Preheat oven to 350. Grease and flour 6 muffin spaces in your tin. (baking cups will stick)
  2. Whisk eggs, honey, banana cinnamon,  and salt in medium bowl until very smooth.
  3. In small bowl mix buckwheat and baking soda well.
  4. Mix dry ingredients with wet. Add apples and mix well.
  5. Pour mixture into tins filling almost to the top.
  6. Bake for 30 minutes or until a toothpick comes out clean.

Monday, February 11, 2013

How to Plant an Orchard

When planting an orchard there are a couple things that will help make your experience a success.

Find a nursery that has healthy plants.  Ask around for recommendations.

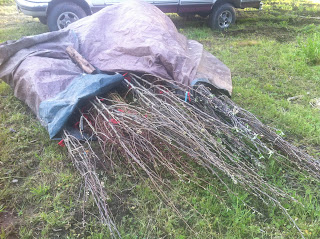
It is best to buy your bare root trees and get them in BEFORE they bud out.  As you can see we were late in doing this.  The weather is forgiving and cool here and so we had success despite our late start.
keeping bare root trees before planting


Keep your roots moist while awaiting planting!

We wet out tree roots and wrapped them on a tarp to keep them moist.  We also put them in a shady spot.

You can heal them in or if you have a tub large enough you can put the roots in water with some vitamin B and/or liquid seaweed.  This will help with avoiding transplant shock.

DO NOT, however, leave the trees in water for days on end.  You should try and get your trees in the same day or the next for best results.

Laying out orchard lines Heron's Nest Farm


Prepare your site

You want to till your ground, removing weeds. Adding lime if your climate requires it is a good idea.  Getting the PH neutral is a great place to start.

Our ground was a little rocky, which is great for drainage.  We needed to do something with this rocky river loam area and trees were a good solution.


Think about spacing

If you have a farm you may be thinking of the long and short of your orchard.  Our trees were semi-dwarf. We chose a triangular, or staggered layout.  The trees triangulated on 12' centers.  (You can, however choose different layouts as described in articles online from your local extension service.)  I achieved this by laying out a string line heading down the bed to square off of.

I then took three stakes, and tied them together with string 12' apart.  They were tied so that I could simply move one end down, moving the triangle putting a flag where each hole went.  This took 2 people.  I tried it alone, but it was just impossible by myself.

Soil amendments Heron's Nest Farm
Dig your holes

Once the flags are out marking where your holes should go, it's time to dig.  I recommend digging the holes BEFORE you pick up your trees to avoid delay on getting them in.  You will want to run a string line down the beds to get your trees centered for straight lines.  Without the string your eye will fool you.  This is something you don't move so getting it right is important.  Remember you have to look at this for 40 years!

The holes should be as deep as your longest root, but you can trim side roots if you wish.  I wouldn't trim them shorter the 14".  All the existing root growth is available for better establishment of your trees.

This may sound silly, but make sure that you put the dirt you dig out from the hole directly next to your hole in a neat pile for refilling.  You would be surprised how many folks can't dig a hole.  They have just never done it.  I have come back more than once to find that a worker has thrown the dirt far from the hole!  If someone else is digging you may want to carefully outline the process to them.


String lines for planting straight Heron's Nest Farm
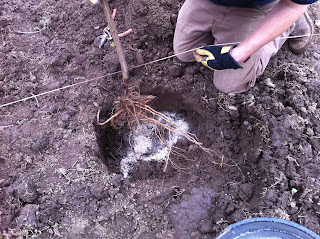
Oyster shell at feeder roots Heron's Nest FarmWhat to add to your trees holes

So what do I add to the holes for my new trees? There is a lot of debate about this.  If your soil is dense or clay you want to make sure to add organic matter and sand for adequate drainage.

I added feather meal (for nitrogen) to the bottom of our holes for my trees to discover as they grew deeper roots.


Putting bare root trees in

Trim the ends of your tree to fit the hole.  Make sure that downward roots are not wrapping around making a "J" root. You want those roots headed down and deep.

Make sure your trees  are sitting up straight, that your graft point (you can see it to the right where the tree takes a jog) is going to be above the soil, and you are centered with your string line for straight rows you can enjoy looking at.

Final tamping after feeding Heron's Nest Farm
Carefully fill the hole pushing the soil in between the roots.  Air pockets can leave room for standing water, or worse yet, critters.

About 2" from full I added about 1 cup oyster shell which will sit around those tiny little feeder roots you are probably seeing.  Oyster shell neutralizes pH, adds trace minerals over a period of time as it breaks down, and helps with drainage. I cover my oyster shell and tamp the remaining soil.

I do not add compost to my holes because I want the tree to focus on root growth, not vegetative growth above. In following years I will add more nitrogen to focus on upward growth.


Water in your new orchard

It was sprinkling when we put out orchard in, but still I filled every hole with water to assure complete settling of soil and moistening of the roots.  DO NOT tamp soil after watering.  You do not want to compress air spaces at this point but rather allow natural settling of soil.

Watering a new orchard

Make sure your soil stays moist during those first few months.  You don't want those roots drying out.  Pay attention to the soil moistness and water as necessary in your area. You can also head out after that first day planting and straighten your trees if you find a few wonky ones out there.


Friday, February 8, 2013

Buckwheat sooo yummy!

So recently I came across a recipe for Banana Buckwheat Muffins that were to be eaten during a detox. I made them and they were sooo good.  Since then I have done a little research on buckwheat as I was unsure as to what it really was. I've written up some nutritional facts about Buckwheat which will hopefully peek you interest in trying this tasty treat.

  • This food is low in Saturated Fat, and very low in Cholesterol and Sodium.
  • It is also a good source of Dietary Fiber, Magnesium, Copper and Manganese
  • It has an amino acid score of 99!  This makes it a great almost complete protein.
  • If you consume it with something vitamin C rich you have a better chance of absorbing its iron.
  • It's not wheat and therefore GLUTEN FREE!
  • Buckwheat is a seed for all you raw foodies and Paleo goers.
  • Good source of B vitamins.
It's a strange pyramid shaped seed that is high in rutin which is believed to promote heart health and prevent disease.
 
You can buy it ground like flour or whole toasted and untoasted; buckwheat groats as they are called.  Adding it to your diet could be very fun as it has been for me.  It's really tasty and easy to find.  Bob's Red Mill sells it in stores or on Amazon if you are isolated.
 
I'm wondering about growing it myself, but I find grains are very troublesome to harvest and clean.  Better off to just buy most of them.  Be watching as I post new recipes for the gobbling using this wonderful new friend of mine!
 

Friday, February 1, 2013

Honey Lemon Jelly

Be creative when choosing a honey.  There are really a lot of different flavored ones out there, dependent on what the bees are eating.  Contact your local bee keepers to sample and buy a special honey for your cupboard.  Clover honey will do just fine for this though.

Ingredients
2 or 3 medium lemons
1 1/2 c water
3 1/2 c sugar
3/4 c honey
1/2 6oz package of pectin or apple skins (see footnote*)
Makes 5 half pints


Directions

  1. Using a peeler remove the yellow zest from one lemon.  Cut the peel into thin strips and set aside.  Squeeze the lemons to get 1/2 c lemon juice.  You can reserve the rest or grind the leftovers up in your garbage disposal for a sink cleaning.
  2. In 6 qt (nonreactive) pan combine lemon juice, lemon peel strips, and water.  Add sugar.  Cook over medium heat, stirring frequently until sugar is dissolved. Add  honey.  Bring to a rolling boil stirring constantly.  Add pectin all at once or peels and return to boil.
  3. If using pectin:  Stir constantly and boil for 1 minute. Proceed to step 4.
         If using peels: allow mixture to simmer for 10 minutes stirring frequently. Remove peels with        slotted spoon after ten minutes and proceed with step 4.
     4.  Turn heat off.  Skim foam from surface.  Remove peels of lemon with slotted spoon.
     5.  Ladle hot jelly into hot sterilized 1/2 pint jars.  Wipe rims and affix lids with rims finger tight.
     6.  Process in water bath for 5 minutes.

*I like to use apple peels for pectin.  I simply carve away the peels with a knife leaving 1/4" or so of apple meat.  The natural pectin in the apples is sensible to me.  However, your jelly will not be completely clear as the apple will boil off and fall into the mixture.  I think the taste difference is slight and my kids love it.  I you want clear jelly, use pectin. For this small of a batch I would use the peels from 1 large green apple.